How to Remove Swirl Marks From Car Paint: Professional vs DIY
A comprehensive guide to understanding and removing swirl marks from your vehicle's paint, comparing professional paint correction with DIY approaches for Boise vehicle owners.
Introduction
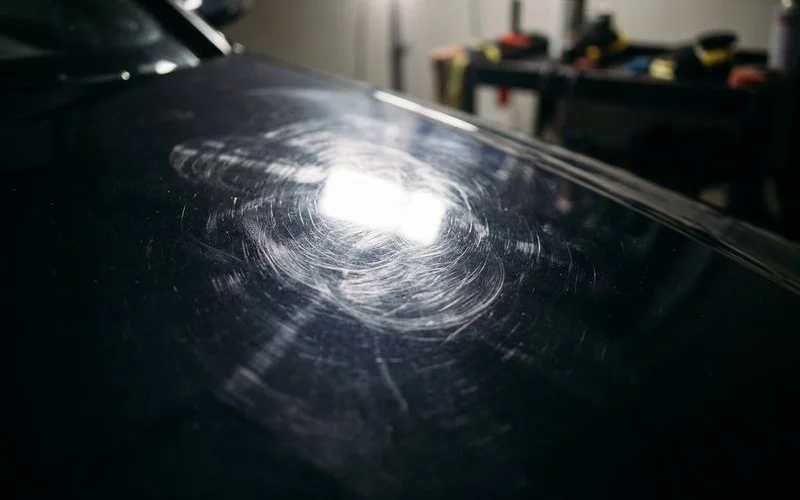
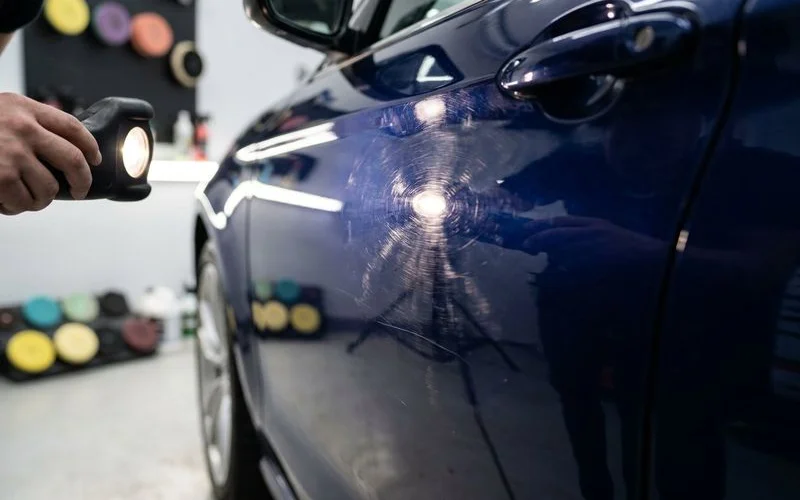
You know that frustrating moment when you walk out to your clean car in the sun and see a web of fine scratches covering the hood. We call this the “spiderweb effect,” and it turns a glossy finish into a dull, hazy mess. Swirl marks aren’t just dirt or residue; they are thousands of microscopic cuts in your clear coat that refract light in every direction.
Our team has corrected paint on everything from daily drivers to show cars, and the solution always comes down to one thing: leveling the surface. You have to physically remove a microscopic layer of clear coat to make the scratches disappear.
Here is the reality most people miss: modern car paint is thinner than ever. From what we are seeing in the shop, factory clear coats have dropped by nearly 20% in thickness over the last two decades. This means you have less material to work with than you might think, making the margin for error incredibly slim.
We are going to break down exactly how these marks happen, the data-backed ways to measure the damage, and the honest differences between fixing them in your driveway versus hiring a pro.
What Causes Swirl Marks
The primary culprit is almost always contact friction. Every time you touch your vehicle’s paint, you risk creating these fine scratches.
Automatic car washes are the worst offenders. We often refer to tunnel washes with spinning brushes as “scratch tunnels” because those nylon bristles slap dirt from the previous truck right onto your sedan. Even “touchless” washes can cause issues if they use high-pH (alkaline) chemicals that strip wax, leaving your clear coat exposed to the elements.
Hand washing is safer, but only if your technique is perfect. Using a single bucket for both wash and rinse water means you are rubbing grit back into the paint. Drying with an old bath towel or a dirty chamois is another guaranteed way to install swirls.
In the Boise area and similar dry US regions, the environment works against you. High dust levels mean your paint is often covered in abrasive particles before you even start washing. The mineral-heavy water here also leaves deposits that harden on the surface, requiring more force to remove and leading to more scratches.
Assessing the Severity
Before you grab a polisher, you need to know what you are up against. Factory clear coat is incredibly thin—usually between 35 and 50 microns. To put that in perspective, a standard Post-it note is about 75 microns thick. You have very little room for error.
We categorize swirl marks into three levels to determine the safe correction method.
Light Swirl Marks
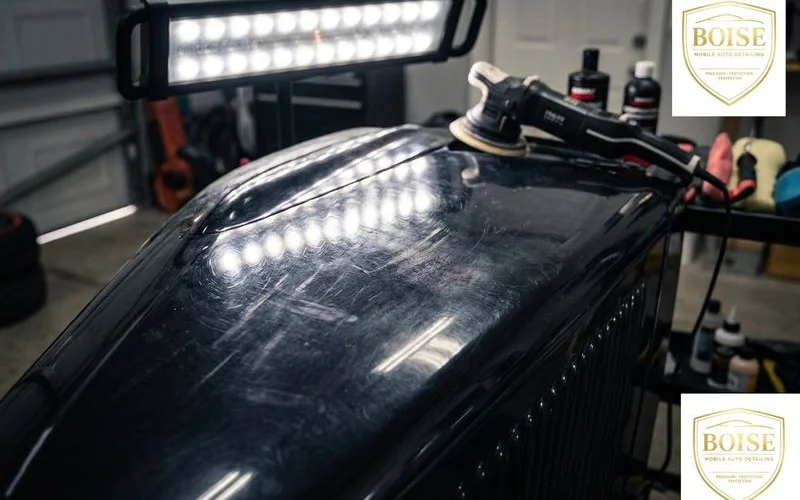
These are surface-level “love marks” visible only under direct sunlight or specialized inspection lights like a Scangrip MultiMatch. You cannot feel them with your fingernail. Light swirls usually respond well to a one-step polish using a finishing pad. This is the safest zone for DIY attempts because you are removing less than 2-3 microns of material.
Moderate Swirl Marks
You will see these defects even in cloudy weather or under streetlights. They create a distinct gray haze on dark cars. Removing them requires a “two-step” correction: a cutting compound to level the defects, followed by a fine polish to restore gloss. This is where the risk increases, as you might need to remove 5-7 microns of clear coat to get a perfect finish.
Heavy Swirl Marks and Scratches
Deep marring, random isolated deep scratches (RIDS), and etching from bird droppings fall into this category. If your fingernail catches on the scratch, it has likely penetrated through the clear coat. Attempting to buff these out completely can compromise the paint system, leading to clear coat failure (peeling) down the road. These defects often require wet sanding, which is strictly a professional-only procedure.
The DIY Approach
For owners with light to moderate swirls, correcting the paint at home is a rewarding weekend project. The key is to manage your expectations and budget for the right equipment.
Tools You Will Need
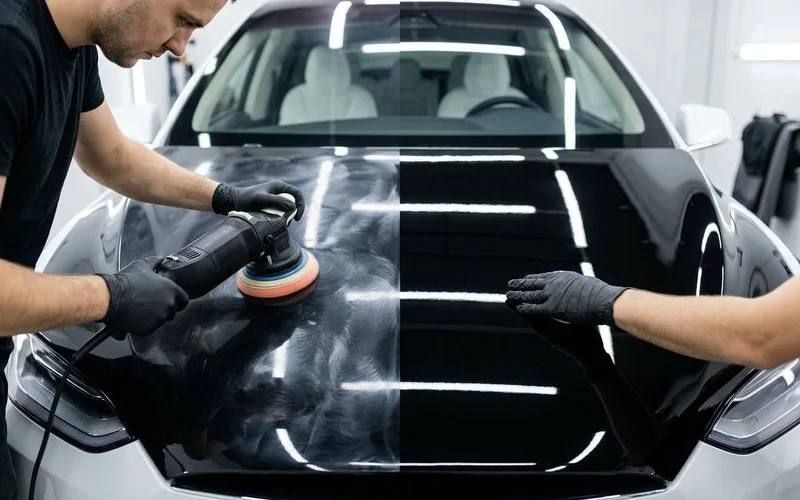
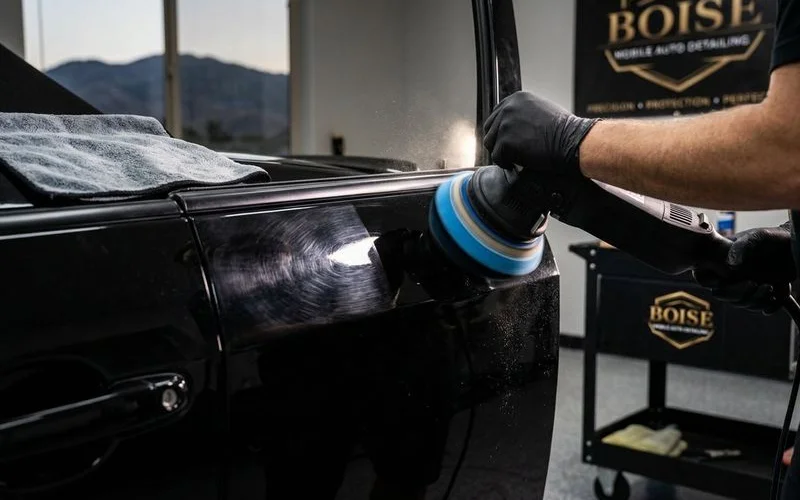
- Dual-Action (DA) Polisher: Avoid rotary buffers which can burn paint instantly. We recommend the Griot’s Garage G9 or a similar 9mm throw DA polisher for beginners because it balances power with safety.
- Pads: A mix of foam cutting (orange/microfiber) and polishing (white/yellow) pads. You will need at least 4-5 pads per car to prevent them from getting saturated and hot.
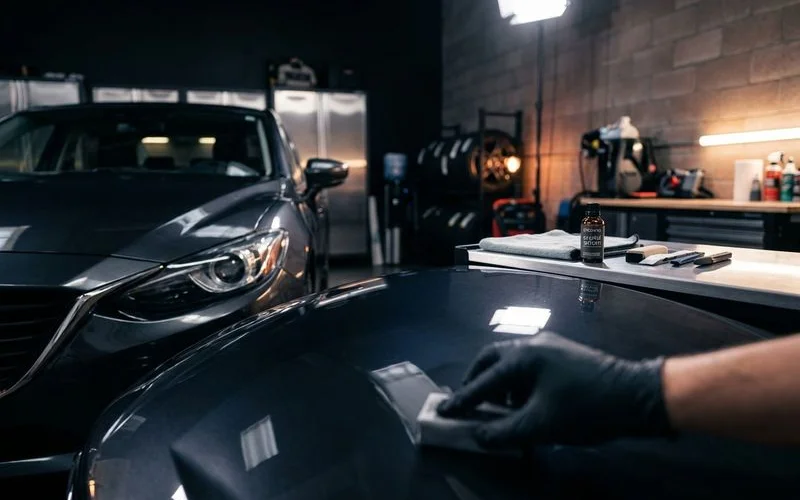
- Compounds & Polishes: A bottle of cutting compound (like Meguiar’s M105) and a bottle of finishing polish (like Meguiar’s M205).
- Prep Supplies: Clay bar kit, iron remover spray, and isopropyl alcohol (IPA) diluted to 15% to wipe down panels.
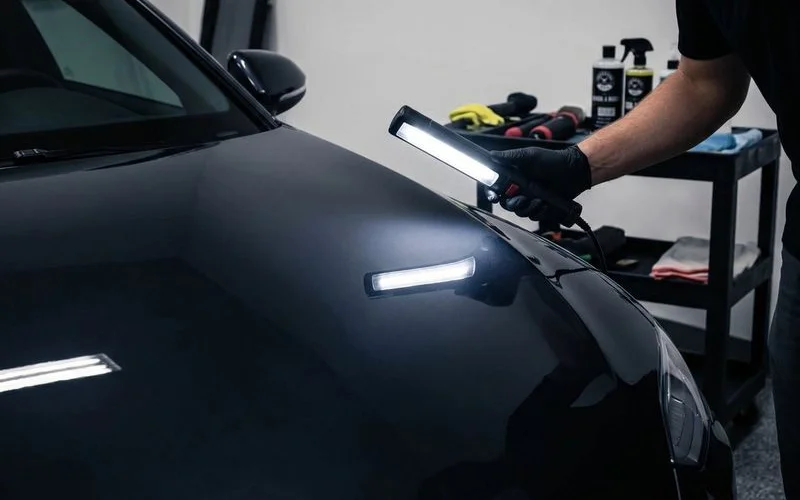
- Lighting: A handheld LED detail light with a CRI (Color Rendering Index) of 95+ to see your progress accurately.
- Protection: Painter’s tape to protect plastic trim from staining.
The Process
Start with a decontamination wash. Use an iron remover to dissolve brake dust, then clay bar the paint to pull out embedded grit. If you skip this, your polishing pad will pick up that grit and grind it back into the paint, creating deeper scratches than the ones you are trying to remove.
Our team recommends the “test spot” method. Tape off a 2x2 foot section on the hood. Start with your least aggressive pad and polish combination. Make 4-6 overlapping passes moving slowly (1 inch per second). Wipe off the residue and check with your light.
If the swirls are gone, use that combo for the whole car. If they remain, step up to a more aggressive compound or pad. This conservative approach preserves your clear coat.
Comparison: DIY vs. Professional Correction
| Feature | DIY Correction | Professional Correction |
|---|---|---|
| Initial Cost | $300 - $500 (Polisher, pads, fluids, towels) | $500 - $1,500+ (Depending on stages) |
| Time Investment | 12 - 20 Hours (Learning curve + labor) | 0 Hours (Drop off & pick up) |
| Defect Removal | 50% - 70% improvement typical | 85% - 95% improvement guaranteed |
| Risk | Moderate (Burn through, hazing) | Low (Insured & experienced) |
| Paint Safety | Guesswork (No depth gauge) | Measured (Depth gauge analysis) |
DIY Limitations
The biggest hurdle for DIYers is the lack of measurement tools. Without a paint depth gauge, you are flying blind. You don’t know if a previous owner already polished the hood thin. If the total paint thickness drops below roughly 75 microns, the clear coat is likely too thin to correct safely, and you risk UV failure.
Dark colors like black or midnight blue are unforgiving. We often see DIY jobs that removed the swirls but left “holograms” or “daze”—faint trails from the polisher itself—because the finishing stage wasn’t refined enough.
The Professional Approach
Professional correction isn’t just about better tools; it’s about diagnostic precision. We treat paint correction as surgery for your car’s finish.
Experience and Measurement
A professional detailer starts with a paint thickness gauge (PTG), such as a DeFelsko PosiTest. This device measures the total film build on every panel. If we see a reading of 80 microns on a door that should be 120, we know that panel has been aggressively corrected before. We will adjust our process to use a finer polish and preserve the remaining material.
We also understand paint systems. A sticky “soft” clear coat on a Subaru requires a completely different pad and speed combination than the “hard” ceramic clear coat on a German sedan. Treating them the same leads to disaster.
Equipment Quality
Professional large-throw polishers (like Rupes BigFoot systems) cover more surface area and keep the paint cooler than consumer units. We use forced-rotation tools for heavy cutting that won’t stall on body curves, ensuring the scratch removal is uniform across the fender, door, and roof.
Controlled Environment
You cannot effectively polish a car in direct sunlight or a dusty driveway. Compounds dry out too fast in the heat, creating dust that scratches the paint. Our shop uses temperature control and high-CRI lighting that mimics midday sun to reveal every defect before the car leaves the bay.
When to Choose Professional Correction
Deciding between a DIY attempt and a pro service depends on your goals and the vehicle’s condition.
Consider hiring a professional if:
- You plan to install a ceramic coating. The coating locks in the paint’s condition for years. If you coat over swirls, you are stuck with them until you polish the coating off.
- The vehicle has dark paint. Black cars show every error, including the faint haze left by cheaper consumer polishers.
- You have deep scratches. If you need to chase heavy defects, the risk of burn-through is high without a depth gauge.
- Time is a factor. A proper multi-stage correction takes a full weekend or more for a beginner.
- Resale value matters. A verifiable professional detail can add significant curb appeal for high-end listings.
For vehicle owners in our region, or anyone dealing with hard water spots combined with swirls, professional correction is often the only way to safely remove those mineral etchings without pitting the clear coat.
Prevention Going Forward
Once your paint is corrected, your only goal is to touch it as little as possible.
Adopt the two-bucket wash method: one bucket for soapy water, one for rinsing your dirty mitt. Place “grit guards” in the bottom of each bucket to trap dirt. Never wipe a dry car with a towel, no matter how soft the towel claims to be.
We also recommend using a drying aid or a leaf blower to dry the vehicle. If you must use a towel, upgrade to a high-GSM (Grams per Square Meter) twisted-loop drying towel, ideally 800 GSM or higher. The less you drag a towel across the surface, the longer your paint will stay swirl-free. These small habits protect your investment and keep that mirror finish intact.
Conclusion
Swirl marks are a fact of life, but they don’t have to be permanent. Whether you choose to invest in a DA polisher and learn the craft yourself, or trust a professional team to restore your vehicle’s depth and gloss, the result is a car that looks newer than the day you bought it.
If you are ready to see what your paint is actually supposed to look like, start by assessing your clear coat’s condition today.
Boise Mobile Auto Detailing Team
Professional detailing specialists serving Boise and the Treasure Valley.